The beginning
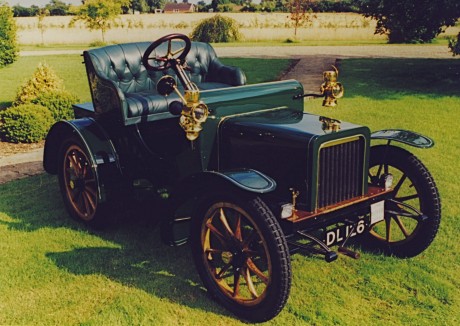
Sunday, February 28th, 2010This is an account of my early dealings with DL 126 many years ago, and some of the problems I encountered when I bought the car in 1998 and carried out a major restoration on it.
First published in the Gazette of the Veteran Car Club of Great Britain, December 2001.
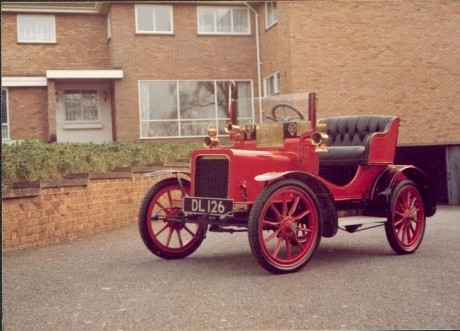
Over thirty years ago, I had a phone call to ask if I repaired old car engines. My hobby, from a very early age, has been tinkering with anything mechanical and I had earned the reputation of doing the impossible with engines that had been left outside, buried or submerged. Some, we knew, had been under ground for more than 40 years (oddly enough they tended to be the easy ones). I replied, “It’s not actually my job, but I like a challenge!” It turned out that a little 1906 Rover, belonging to Mr. Pointer, had stood refusing to start or run properly for 12 years. The local Rover club had asked the Pointers whether they could borrow this for their annual rally. It seemed that Mr Pointer had said, “It would be nice to get the car running, could someone in the club do it?” Someone was given my name, the Rover club got in touch with me and we arranged a date to meet and look at the car.
Not knowing what to expect I took everything I could in the way of tools, although people have sometimes been amazed when I have diagnosed a major fault and got an engine running again in minutes. When I first saw DL 126 it looked in good order. I always start by looking carefully round the car, what has been done to the parts that are visible is often a good guide what things are like inside. What I am told about a problem and anything that has been done to try to solve it is usually a less reliable guide.
Various ‘experts’ had, supposedly, looked at this car and it was said that someone’s wrist had been broken in trying to start it. I immediately noticed that the advance and retard linkages were not right, but the engine had good compression, trembler ignition and petrol was getting through. After about three hours spent carefully checking that it was mechanically safe, sorting out the advance and retard linkages and resetting the timing I was ready to start the engine. It fired first pull. At this stage it didn’t run too well because the carburettor slide stuck repeatedly, but for the first time in 12 years, it could be driven a short way. Apparently there had been some betting that it wouldn’t start first time. Somebody got a bottle of whisky as a result.
Everyone was satisfied except for me. I didn’t like leaving it running so unreliably and said so. I was then asked whether I could repair the carburettor, which I did, making a new slide and spending about a week checking over the rest of the car. In that time I got to know the Pointers’ chauffeur, Mr. William. He was a character; he was tall (6′ 2″) and had been a tank driver during the war. It appeared that he still drove the Monteverdi or the Rolls as he would a tank, making one sit rather quiet as a passenger. However, after a short while, it became evident he was actually a very competent driver. The way he handled the Rover was amusing, he would just climb aboard this little car, put (force!) it into gear and go, all in one movement. This slow little car, with him driving, seemed to intimidate other traffic. (I don’t have the same confidence and always feel that vehicles are bearing down on me.)
Something still wasn’t right, however, the clutch wasn’t freeing and the gears were just being crashed in. The clutch is of the oil bath type, and lubricated by oil mist only. I drained about a half a gallon of oil from just the clutch compartment, which was excessive since the combined engine, clutch and gearbox take in total just over a half a gallon. Unfortunately there is no means of telling how much oil is actually in there. I asked William what he had been doing with the oil; he said he was doing exactly what he had been told to do, filling the cup if it was empty before starting the car. Now this cup is always empty before starting, the flywheel then automatically fills it when the car is running; it should only be necessary to add one pint every 70 miles. At least it hadn’t been run dry of oil!
Some weeks later I drove DL 126 from Norwich to Bressingham for the Rover Club rally, a round trip of about fifty miles, without using any oil or having any problems. I did however point out some things that needed looking into and I said that although it ran perfectly there was a large amount end float on the engine’s crankshaft, which could be causing damage to other parts. The car was offered to me on permanent loan, but sadly, for various reasons, I did not feel that I could take them up on this offer at the time. I didn’t hear of the car for a couple of years then I got a phone call to say that it was continually flooding and wouldn’t start. All that was wrong was that the carburettor drain screw had been lost; two minutes later we were driving down the road. I parked it back in the garage but didn’t see anybody to speak to; this must have been shortly before Mr Pointer’s death.
Some years past before I had another a phone call about the car, this time the problem was more serious. Apparently it had started with the output gearbox shaft breaking. Almost immediately afterwards, the bronze bearing housing had broken on that end of the box. I believe that only a couple of outings after repairs had been made, and it was this that the phone call was about, the rear axle aluminium casing had broken in several places. “Could I weld it?” was the question. “No, I didn’t weld aluminium as it would be a highly specialised job and needed care,” I replied. It seemed that they blamed the transmission brake for some of the damage (the clutch pedal and transmission brake are combined on the Rover). When I had first driven the car the transmission brake had been over adjusted to such an extent that if you tried changing gear you stopped before the clutch disengaged and, knowing the dangers, I had de-adjusted it so it hardly worked. Evidently it had been wrongly adjusted again. I advised them to disconnect it but, sadly, it was completely removed and lost.
I heard nothing more of the car for a number of years, but finally I did get in touch with the Pointer family to ask whether they still had the car. They still had it, but it hadn’t been running for about nine years. I was told it had been restored and was for sale. I was eager to buy the car, but I wouldn’t have been quite so keen if I had known what this ‘restoration’ had done to the car. Putting the damage right was to tax my skills, and the skills of others, to their limits.
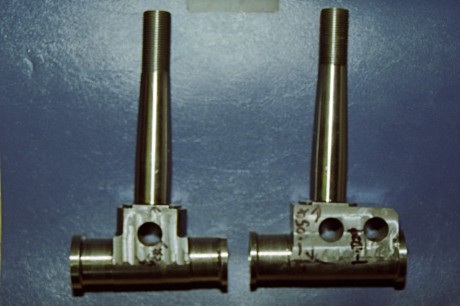
The reject stub axles. The initial turning was good quality, but there was a lack of understanding of how to accurately position the holes.
I like to do as much as I can myself because it’s a challenge and when you succeed where others fail there is a wonderful sense of achievement. There were, however, some low points. These occurred when I had to go to professional precision engineers (?!) because I did not have the equipment to do the job. The first of these occasions was when I needed to have new front stub axles made. My milling machine was not large enough or I would have made them myself. A local firm, supposedly able to work to BS EN ISO 9002, assured me they could make copies of my old stub axles. In the event they machined the holes up to 0.060″out, so this attempt ended in the scrap bin. They declined to make a second attempt. If I can measure to the nearest thousandth of an inch just using an old surface plate, parallel bars, try square, vernier callipers and feelers, they should have been able to do so with the instruments at their disposal.
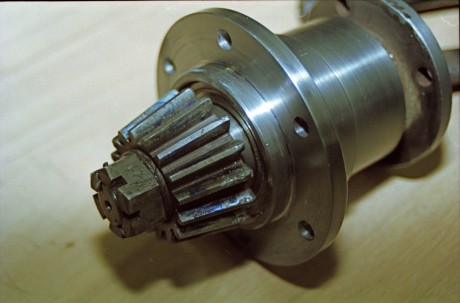
I had similar trouble this year getting a new pinion for the back axle. The original pinion had been damaged when the axle casing was broken and more damage had been done when the axle had been reassembled incorrectly. The cost of a replacement put me off replacing it at first, but after only 1500 miles metal was coming off and damaging the plain bearings. I approached a local firm, and was told it would be an easy job for them. To keep the cost down they supplied the materials for me to make three blanks, from which they would then make the gear. A few weeks later, after supposedly losing my blanks and then making six further attempts at cutting the gear they gave up. Eventually I went to Llewellyn’s Gears in Bristol, who made a first class job, but this (unsurprisingly) cost much more than the local firm had quoted.
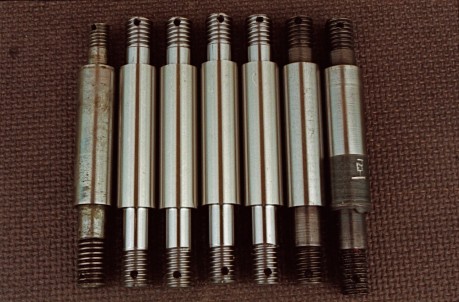
The differential on the Rover has four spur gears and pins, and I decided that I should replace the pins, which ought to have been a straightforward job. I went to a heat treatment firm who measured the hardness of my original pins and recommended the metal to be used. Because of pressure of time I decided to let a firm of precision engineers do this simple machining job. Before the new pins were sent to be heat-treated I measured them and found that they were 0.032″ short! Another set had to be made, this time, once they had been heat-treated and ground, I decided I didn’t like the finish as it could be easily filed. I sent them down to Bristol and they confirmed that the hardness was only 45 instead of 60 and the metal I had been told to use was the wrong material anyway. Once again Llewellyn’s made a superb job (at a price). I had sent a drawing indicating the tolerances I was prepared to accept, but this time the machining was precise, they never went to any of my limits. This is the sort of accuracy that I like to work to but it seems very hard to find people who are prepared do so today.
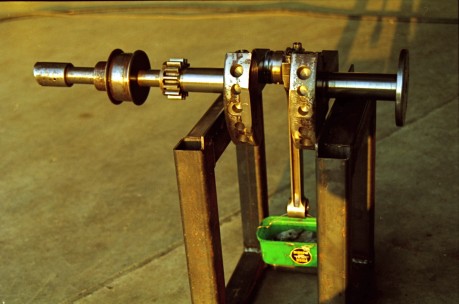
I was not always unlucky, however. When I was rebuilding my engine I had to replace the piston and the connecting rod. The piston in the car was not the original one, it was probably from a compressor, so the engine had been running quite badly out of balance. This had put strain on the connecting rod and caused a crack to start. I was unable to obtain a piston to the original specifications and had to use a lighter one. I had not initially considered the problems of balancing a single cylinder engine where at one end you have a reciprocating motion and at the other a circular motion. Several phone calls later I was feeling that this subject was something of a minefield. I had been given various ‘rule of thumb’ figures for the balance weight ranging from 50% to 70% of the piston weight. Fortunately I was finally recommended to get in touch with Trevor Hedges, an expert at balancing racing motorcycle engines.
Trevor could not have been more helpful. I took my crank, connecting rod and piston down to his workshop and he made the necessary measurements. My crank was only just skinny enough to fit on his set of knife-edges (motorcycle cranks are much smaller!). He then showed me how to calculate the balance weight. You take 68% of the total weight of the piston, rings and the little end. The little end is weighed with the connecting rod horizontal, the big end being supported on a knife-edge. You then take the weight of the little end away from this figure to find the weight you need to hang on the little end in order to balance the crank when it is on a set of knife-edges.
Being used to much smaller engines, Trevor was rather taken aback by the figure he arrived at so he then spent half an hour on the phone to someone else to check that he was right. I now had a figure to work to but before I could proceed I had to make my own set of knife-edges, flat and exactly parallel. My wife took a pot and some pieces of lead off to school to weigh out the exact amount required on the science labs most accurate balance. The final result, in my daughter’s words when the engine was started for the first time after the rebuild, was ‘Cool!’
Sometime later, when I drove the car to Trevor’s workshop to show him how well his formula had worked, he did admit that it did not always work that well! Apparently motorcycle frames have harmonics so an engine might need some tweaking, depending on the frame it is fitted in. I did not encounter this problem since the Rover engine only runs at 950 to 1200 revs whereas motorcycle engines run at 12000 to 14000 revs.
There were other ups and downs as I gradually returned the Rover to road-worthy condition, sorting out the carburation, for instance, was an interesting exercise that involved throwing the rule book away. It was very successful, however, the petrol consumption improved from 40 mpg to 70 mpg. If it would be of interest to members I might be prepared to put pen to paper again to explain how I achieved this.
I know that other restorers have met many of the problems that I encountered, but I hope, nonetheless, that my tale is of some interest.
