Brake if you can
Monday, March 1st, 2010A description of how I made sure that my brakes would work reliably, and my opinions about where modifications may be necessary in the interests of safety on the road.
Published in the Gazette of the Veteran Car Club of Great Britain, April 2008
I recently reread Chris Thomas’s article ‘Please Stop’. I have written several letters to car magazines on serious car safety issues. Some of these have not been published, and I wonder whether this is because the truth about the repairs and maintenance of too many cars, even when carried out by ‘qualified’ people, is too uncomfortable or they think the things I describe don’t happen (but they do!). In cars ranging from veterans to 1960s classics that I have been involved with I have seen unsafe repair practices due to a lack of understanding, the belief that ‘it won’t happen’, a “don’t care” attitude, or the fact that a proper job will cost too much. Too often when people try to repair or improve something they fail to do so properly. Too often their attempts leave things worse than they were before, and possibly irreversibly damaged. Sadly, feedback from any published articles has always been poor.
Many people have concerns over the issue of the withdrawal of the use of asbestos from brake linings but I found that such misgivings were unfounded in practice. Chris stated that he prefers riveted linings to bonded ones. Bonding to aluminium is certainly not advisable, as I have discovered for myself. Over time oxide on the surface of the aluminium, although not visible, will cause the linings to peel off. However I will still use linings bonded onto steel clutches or brakes in certain circumstances. Chris also mentioned profiling shoes after fitting, which I believe is vitally important. It takes years for shoes to bed in on cars that do a limited mileage each year. A most helpful aid to seeing what is actually happening is a cut-away drum. I usually have had to make a suitable replica drum and hub for this purpose, as a spare drum is not usually available. This replica must be of the same strength as the original if it is to give a good idea of what is happening to the shoes under load. I have seen some brake shoes that distort almost as if they were made of rubber. This is clearly undesirable. Sufficient rigidity is most important as flexing of any component does not transmit movement.
Brake and Break
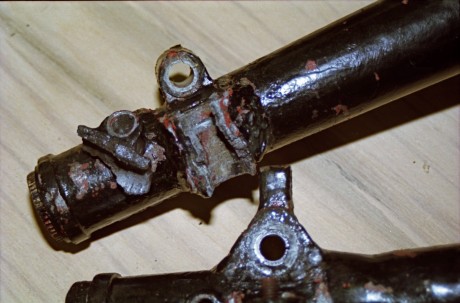
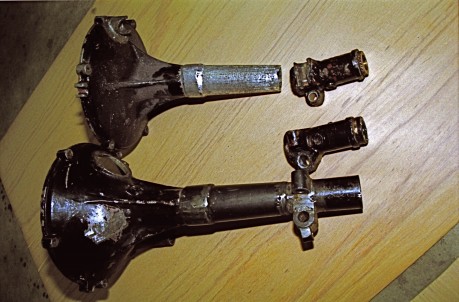
I inherited severe problems with the braking system on my 1906 Rover 6hp. Poor design and weak metal had resulted in a catastrophic failure at some time, followed by the worst repairs imaginable. The axle is conventional in construction consisting of a two-piece cast aluminium casing bolted together in the centre. There are two steel brake cross-shafts with one end spigotted into the centre and the outer end supported on steel arms that are fitted directly into the end of the axle casing. The fact that the fitting for this support arm was part of the axle casting meant it was not strong enough. This weakness probably showed up quite early on (Rover altered the design by 1907). Both arms had pulled out, one end of the axle casing had been snapped off 6 inches from the end, and at some time a differential pin had broken, punching a hole in and cracking the side of the differential case. All this damage had been repaired in the worst possible manner, with gas welding that left the aluminium looking like mouldy wet bread, MIG welding that looked like bird droppings and a type of alloy solder just laid on the surface.
What could I do? My aim was to put the car back on the road in a safe and reliable condition keeping as much of the original as possible. The aluminium was in a very poor condition towards the outer ends, but luckily the casting was better towards the centre. The axle had been broken in four places.
My solution was as follows: the un-weldable ends were cut off, steel sleeves were made and shrunk on the the remainder of the aluminium trumpet ends, copies of the cut-off ends were made in steel and accurately welded into place on the steel trumpet sleeves. There was, however, still a serious concern. My repair was strong enough, but was the alloy that it was attached to strong enough to take all the breaking and driving torque? This torque was transmitted though an aluminium torque tube that had already pulled the studs out of the axle. Whoever drilled out the casing to take larger studs (why I can’t imagine) had drilled through the flange and through the differential housing as well, leaving holes for oil to pour out. The holes were not even in straight.
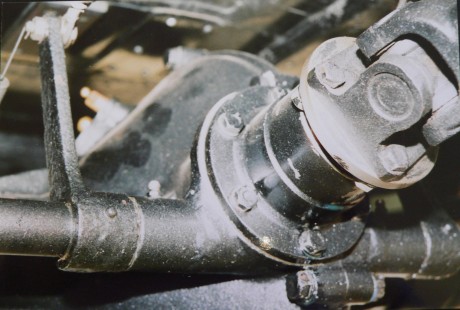
This junction of torque tube and differential casing was a major design weakness. By this point in my rebuild I had made contact with other owners and had been to see some other 6hp cars. I found that all early axles like mine had been similarly broken at some stage and had been repaired, but I felt that these repairs were not as good as they could have been. Where a possibly dangerous weakness exists, repairs must be carried out to achieve the end that they can take all the strains put upon them and are 100% safe. In my opinion any repair I made had to be an improvement on the original to make the car safe on the road. One of the axles I saw had already been modified, by cutting the original torque tube. I did not wish to alter a sound original part, so instead I manufactured a new pinion housing out of steel, a new prop shaft and a new transmission brake drum. The original parts have been preserved so that, should anyone wish to, they can easily be fitted back onto the car.
By making this modification I was able to transfer all the torque generated by driving and braking onto the rear springs, to which I had already added an extra leaf (just as Rover did later). All the damage to the aluminium was welded up properly. I had four new differential pins made, increasing the diameter of one end where there had been a previous failure. The two bronze bearings either side of the differential had suffered from lack of lubrication. These were originally grease lubricated by hand, but I decided to make them self oiling by drilling the axle casing to allow oil running down the inner surface of the casing to reach the bearings. I found in my archive of salvaged parts – two heavy-duty ball races with integral oil seals that fitted the half shaft and the axle exactly. The outer ends of the half shafts were worn along with the wheel hubs, and both were turned true. Fitting thin bushes would have been a bodged job, fortunately the hubs were just thick enough to take a tapered bush for half their width, stopping any further wear from taking place.
A couple of years after my car had been put back on the road I was given a later axle which showed the design changes that Rover had made themselves. It was very satisfying to see that the alterations I had made, except for replacing the torque tube and fitting ball race/oil seals to the half shafts, were present on this later axle.

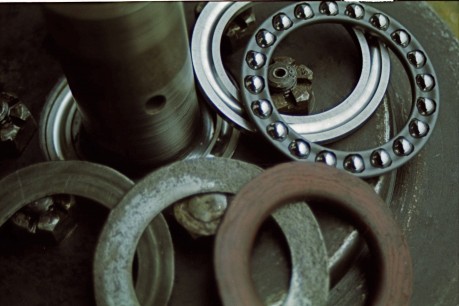
Two rusty washers and a fibre washer had been used as a replacement bearing, my modern bearing is shown behind. on all the cars I have seen the original thrust bearing seems to have failed early on.
Over the production run Rover in fact tried four different axle designs, but still kept the Achilles heel of the torque tube. From the start they knew that they had a weakness at the junction of torque tube and axle and tried to counteract it by mounting the axle pivot behind the rear of the axle shaft, thus using part of the weight of the car to counteract the strain caused when braking. This seems an odd way of trying to fix the problem and was not successful, as you can imagine. My method was simpler and more effective, involving fitting only one extra universal joint and a lighter bearing housing rather than their aluminium torque tube. With two universal joints to the prop-shaft, instead of the original single joint, all the strain was taken away from the rear of the gearbox casing and also away from the weak junction with the differential casing.
I believe that my modifications were the right way to go. The axle still looks like one that Rover designed, and 90% of the original casting remains, albeit strengthened with steel. The prop-shaft has a modern universal joint, but uses a small diameter solid drive shaft such as was used in many early cars. I know that I have moved away from the original design in respect of the torque tube, but it is possible to convert it back quickly and easily at any time. More importantly I also know that in making this change I have made the car safer on the road – I can always brake with complete confidence.


